Monday, December 07, 2020

semi-homemade Christmas bells and angel greeting card 2019

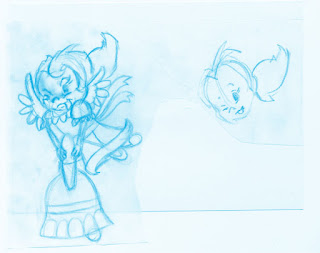
 Another homemade greeting card from last season no doubt. Well semi-homemade. I found this old unused card (probably purchased years ago in the 80's) one time while organizing some stuff. It was still in great shape but a little boring in my opinion. So I decided to jazz it up with a cute angel character since this was a Christmas themed greeting card. Since there was a strong theme of bells also, I drew the little sassy angel character carrying a much too large bell on a piece of tracing paper first. I did this so I can make sure the character would fit on the card and not take up too much space. Then as usual I redrew and traced the character on a piece of card stock and as usual coloured it up. I cut it out and, finally pasted it on and there we go. But I found out that there was no envelope with the card. So I had to make one with what ever I could find. I was lucky enough to score some wrapping paper with the theme of Christmas bells on a shelf in the basement, long forgotten too. Perfect! Made the envelope and placed some white paper on the one side so I could write the important stuff such as mailing address and other. Done! 

I will not show it in the usual spot in my personal site but will feature a link to this post there since this card is only semi-homemade. 


 ๐Ÿ”บThis is the original sketch of the sassy angel character I made on tracing paper with blue pencil. 

A great pencil to use for sketching drawings of all kinds. Makes it easier to erase and not leave too many strong marks. ๐Ÿ˜Š


 ๐Ÿ”บWhile working on this card I remembered the movie "Its a wonderful life" and the part of the little girl's dialogue in the movie. " Teacher says....Every time a bell rings, an angel gets its wings."  Anyways I used mostly markers, some coloured pencils and a touch of a special metallic marker. The gold one obviously. I used some kind of tissue paper for the speech bubble so I could get that "see though" look. ๐Ÿ˜Š


 ๐Ÿ”บThe front of the envelope. Address and embellishments done in gold metallic markers with a touch of red. Personal parts of the address removed. ๐Ÿ˜Š


 Also a small update to some of my links in the side menu. Now usable. LOL ๐Ÿ˜›


Wednesday, November 04, 2020

Just a little update

 The new birthday card now available for viewing in my personal web site. 

Also now available. Some newish stuff at Pond5. https://www.pond5.com/artist/ktgrafix#1/3072


Thursday, October 29, 2020

homemade Fall Birthday card 2019

 A lovely birthday card I made last year for a friend. She loves these types of whimsical style cards and I had a enjoyable time creating it. Also makes a great portfolio and memory piece.

Featuring animal friends of the forest celebrating a fall birthday with all the trimmings. 

The card its self is made with coloured construction paper. On it I free handed a drawing with a coloured pencil and later added detail such as shading with you guessed it more coloured pencil and a bit of marker to make things pop. 


First I free-handed an image in a yellow pencil to make it stand out. ๐Ÿ”บ


 Second phase. Starting to add shading. Finding my way around the card
too. ๐Ÿ”บ


 Third phase. Really starting to take shape. Got to keep on working. ๐Ÿ”บ


Forth phase. Just about done. ๐Ÿ”บ

Using white coloured pencil here is relatively easy here.  


 All done and added the inside part of the card. ๐Ÿ”บ


Then I placed the image illustration on a piece of some kind of white card stock I had on hand. I can't remember what it was because it was a while ago but I'm pretty sure I got it out of my box o bits and pieces. That's where my small pieces of leftovers go when I finish a project. Comes it handy and less environmental waste. 


Added a cute message and other things of which I will not share for privacy reasons. Mostly created using marker and some coloured pencil ๐Ÿ”บ

Since I didn't have an envelope on hand I simply made one out of a white sheet of paper. It seem to be the right size and was pretty convenient. Then I put on the address and decorated it a bit with a bit more forest whimsy. A cute trouble making black squirrel all decked out with a birthday hat and present/gift a squirrel can only provide. 


Added a cute but rascally squirrel on the envelope along with important info which I'm not disclosing for privacy reasons. If your wondering about the blue colour on the black squirrel is because to provide a simulated sheen to his fur๐Ÿ”บAfter all black squirrels are not just black when their fur shines in the sun, you can see shades of colour. Most people might not notice that detail but that's alright. Since I'm qualified I can bring that up for those that are interested in those type of details. 

Hope you enjoyed my latest piece. Artwork will be uploaded to my personal web site soon.Providing that I still get to keep it. Considering where every thing is going these days with the turmoil. 

God bless and keep the peace! 

Friday, July 17, 2020

New Moon Bear set

Now out New Moon Bear set. I actually finished this one months ago but just decided to share it now. I decided to delay sharing this version because of personal use at a new "merch store" I'm trying out and experimenting and I wanted first crack at it. Its mine after all. ๐Ÿ˜‰
The original version was a sketch I made years ago probably while bored or on a break onsite. I then illustrated it in traditional form and made a small Photoshop file for use on my personal site years ago. And now its also available in clip art vector form and in my new "murch store". Links will be provided below the illustrated sample/link. 


https://www.canstockphoto.ca/new-moon-bear-set-83022113.html


Please note that the website priced these for my products and not me.
Proceeds go to the ending of mooching off my parents and gaining my own house and out of my parents. ๐Ÿ˜‰ In other words helps to pay off expenses. Thank you! ๐Ÿ˜Š

Tuesday, June 09, 2020

Pansies in progress

Another flower based post I guess. This time a work in progress. 
Currently working on an airbrushed image to go on a fitted sheet. Problem is that when I originally purchased the sheet I was expecting it to be a cloth even if it was mostly polyester. When I opened it up was more like a shower curtain.๐Ÿ˜• Oh well, so it forced me to do more steps then I originally planed. So I airbrushed on a separate white cloth. Its going to be sewn on to the fitted sheet later.
First I just free handed my desired images. Then airbrushed them. No masking. Just penciled in. They’re a group of pansies. But I won’t bother cutting them out of the excess material. Just going to sew it on. Its only for me after all. 


Monday, May 18, 2020

small personal site update.

Oops another mistake. I forgot to upload the leopard patch pics into my personal website. But they're up now along with the newly uploaded images of my homemade Easter card 2019. Enjoy!๐Ÿ˜Š

Home made Easter card 2019

Oops looks like I made a small "boo boo" in the last one or two postings of my monarch butterfly series. But they're all fixed now and the mistake was not a big deal but it would have bugged me to no end. 

Now for some spring time fun. An Easter card I made last year for a friend. Al little late but it still is technically spring. Its fun to look at none the less. But then there are Christmas related things to boost moral being shown too in different media forms so who cares? And besides if I don't I may never show it off. It just accumulates and all that. Also will be showing soon, other card creations with various degrees of fun.๐Ÿ˜Š
 Some envelope art a bumble bee.๐Ÿ”บ
  Also some envelope art a bumble bee holds a basket and other Easter symbols. ๐Ÿ”บ
 The card cover art. A bumble bee with a basket of eggs and real pressed flowers

Some more art in the card featuring another bumble bee and more pressed flowers. 

Created the card with real flowers I collected the previous year. Some snap dragons and some type of blueish flower that later turned more purple when I pressed and glued them to cardboard to make them more workable.  Other media used, water colours, markers, coloured pencils. Cardboard and construction paper used as well as watercolour paper with texture. I tried to stick to bright colours instead of overusing the colour black for the obvious bee stripes. 
I hope you like it. ๐Ÿ˜Š

Tuesday, April 28, 2020

Monarch butterfly 2 extra

Now out monarch butterfly 2 extra. JPG only non scalable version. But just as beautiful. As always to be featured in my personal web site soon. 
Also another online portfolio bites the dust for me too cause they decided to now charge a usage fee. No biggy. There are still plenty of quality online port providers out there. Its a big pond after all. It was just a backup port anyhow. But none the less I saved all of my info in other words a back up from that place and now I can move to a new spot. ๐Ÿ˜๐Ÿ˜‰
/monarch-butterfly-2-extra-80553421.html

Friday, March 20, 2020

Monarch Butterfly 1 Extra

First of all I just want to say is Please Stay safe. This virus is no joke. Stay indoors and don't go out. Even better do some praying for your fellow man. The least you can do since there are no Easter celebrations this year in a physical building. But we can still celebrate and do some honor in our own vessel for our fellow man. 

Anyhow here is the Extra version of MB1 JPG only form, designed as an option cause you can make it like this in order for it to be a true vector. 

https://www.canstockphoto.ca/monarch-butterfly-set-1-extra-79117170.html


Wednesday, March 04, 2020

Uploaded now

Now out in my personal web site. Monarch Butterfly set 2. You know the way. The side menu. ๐Ÿ˜‰

Monday, February 24, 2020

Monarch Butterfly Set 2

Now out Monarch Butterfly Set 2. This version features the previous butterfly only now the butterfly is feeding on a cluster of butterfly bush/weed flowers. Very lovely orange coloured blossoms. If you can see them in real life, its really something special. Especially when you see other insects other then just butterflies feeding on them. 

https://www.canstockphoto.ca/monarch-butterfly-set-78310043.html
 See previous.

Tuesday, February 04, 2020

Monarch-butterfly set 1 posted

Now featured in my personal web site after a bit of delay due to being under the weather and other acts of nature.  Just go to the side menu and enter. ๐Ÿ˜Š

Friday, January 24, 2020

Monarch-butterfly set 1

A little something for the coming spring and summer season. These little guys will soon be migrating up north once again. I designed these by studying many pics of reference sources. I would take a few pics my self but so far my timing is pretty lousy. Plus I had made a few of these illustrations in the past too for other purposes. So also decided to take advantage of all of that and make a vector illustration version. There are other versions of this too and will be showing them in future coming posts. Enjoy.๐Ÿ˜Š


https://www.canstockphoto.ca/monarch-butterfly-set-1-77297514.html

Tuesday, January 14, 2020

Leopard patch

   I have this purse and I only had it for a few years. This is the type of purse that's a bit on the pricey side of things and I really didn't feel like getting rid of it so soon. So I did a bit of exploring to see what type of patches are out there. Didn't exactly like what I saw. Lots and lots of cheep looking Chinese made patches. Probably only worth 50'cents or lower but sold at a 5 bucks a pop or higher at a fabric shop. Looked in other stores too but the selection was even worse. So I decided to make my own. I first looked at what I had, did some thinking, some more exploring at craft stores est and then looked at my purse some more. Thought to my self. Lets make paw prints and a lounging leopard. I mean why not? I already had found a discarded umbrella cover I saved in my junk box with that same theme to cover up some buckles that always seemed to come apart on my purse. 
So I quickly drew up a cute lounging leopard on some tracing paper. I used tracing paper or parchment paper to first plot out all those holes on my purse. So that's why the leopard is lounging the way it is. The paw prints were for the holes that weren't so close together. So anyways I drew my leopard pattern on the pattern of mapped out holes. Then I found parts of some old jeans. They were remnants that I also saved earlier for these types of purposes too. Comes in very handy. 
I then drew out some paw prints and that leopard on to the scraps of jean materials. I ended up drawing out 3 paws and the leopard. Later I painted them up with some acrylic fabric paint using a regular old brush. I used mostly browns and yellow. Nothing fancy because that would come later. I ended up purchasing some fake plastic jewellery findings mostly shiny gold colour and another sheet of multi coloured gems cause I couldn't just get the right green ones that were the right size for the eyes. Just as well I can save those for another project. So anyways I sewed them all on my now coloured up patches. When finished I gave them a good clear coating for added protection. Later pilfered some "Shoe Glue" from my dad and then cut off the remaining jean material that remained on my embellished shapes. I find "Shoe glue" really great and handy stuff to patch on patches on to things. 
And here you have the finished product. Hope you like it. ๐Ÿ˜Š


 Some different views of my embellished purse with the finished patches.